SCREEN WRITING
The producer is an
individual who develops and orchestrates TV or film productions from start to
finish. This can be a very broadly interpreted title within the industry, but typically,
they are the people who organize all the creative and business elements to
ensure the smooth completion of the production.
The 3 phases of production
are
pre-production
production
post-production
At the beginning of the
semester, students, in the role as producers are in pre-production.
This is the conceiving and planning of the television program. Every program
begins with an idea that is developed into a program
topic. The program topic is the basic premise or subject of the program.
Although an entertainment program like Seinfeld likes
to advertise itself as a show about nothing, it is in fact, always about
something, whether a certain episode’s topic about the problems of maintaining
relationships or dealing with meddlesome parents. The program topic of a
network expose on politics is rather clear-cut to an audience. Little
explanation is required here, except during pre-production when the idea
for the program is being pitched to the executives who
will green light, or approve the production.
During the pre-production
phase, the producers brainstorm and decide what resources they would
need to produce the program. Who is going to be in the program? What will they
talk about? How much is it going to cost to produce
the program? How much time will I need to rehearse the talent? What will the
technical crew be responsible for? What will be needed to be shot and edited before the show taping?
When those questions, among others, are answered, then
they are ready write a script. The script is the blueprint for the program.
Think of it as an architectural plan. Without a solid and well-organized
script, the show will be poorly executed. For the
purposes of this class, students will be asked to
notate on their scripts the program purpose. The program purpose
of a Seinfeld episode could be “to entertain by
exposing the pitfalls of dating the opposite sex.” The program purpose of a documentary
type program on the History Channel could be “to inform and educate the audience
about the key events leading up to the attack on
Every show that is
produced for television is targeted to a particular audience. Target
demographics are aimed at gender and age group. A show like “Will and
Grace” is targeted at males and females 18-49. NFL football programs are
targeted at exclusively male audiences between the ages 25-54, which is also
known as the “money demographic,” because advertisers have determined that this
is the age group with the most disposable income. This why you see so many
commercial spots for cars, vans, and other so-called toys that men like to buy
in their free time. Programming found on the Lifetime network caters directly
to an exclusively female audience of 18-49, with the abundance of highly
dramatic stories dealing with families and relationships under duress. The
products being marketed during a program on Lifetime are strikingly different
from the products being showcased on an “NFL Sunday” type program. Think of
“Palmolive vs. Budweiser.”
With the advent of cable
and now satellite TV, the concept of niche
programming was create to serve narrowly defined audience
demographics. Satellite distribution
revolutionized the way programming is conceived and sold to advertisers. Cable
pioneers like TBS, CNN, MTV, ESPN, and yes, even the Weather Channel, proved
that niche programming could attract audiences and interest advertisers. As is
still the practice, cable distributors like Comcast are charged a percentage of
their subscriber fees for every cable network they carry, based on audience
size. Prior to cable and satellite TV, audience assessment was less complex.
Each of the Big Three broadcast networks (ABC, CBS, NBC) that “owned” every TV
viewer in the country up to the 1980s were not remarkably different in
programming variety. In the estimation of the advertising business, programming is the hook to draw attention to
the products on display in the commercial spots.
The script format used in
this class is the two- column or documentary format. This used because
we tape our programs live in the studio with three cameras. If we were shooting
all of our projects with just one camera film style, we would be using a
single-column film-style script.
Script samples are
available for study on my homepage. It
may be helpful to have a script sample copy to look at during this portion of
the lecture.
The left column of the documentary
format contains all the video directions and cues. Camera shots, video
transitions, and shot elements are notated here. They are listed in sequential
order in relation to the audio directions, audio cues, and dialogue notated in
the right column. All our programs begin and end in a standard format that
includes and opening graphic or title, with theme music, which then leads to a
cueing of a host. Students will be expected to follow this format, as doing so
will reinforce an organized fundamental approach to producing a TV program. If
you were watch any TV show that’s taped live, you’ll note that they begin and
end pretty much the same way. TV shows always end with credits and some kind of
theme music that is appropriate for the topic of the show. A show like X FILES
would not seem the same if you used Mozart for the theme music. Likewise, a
kids’ show like Telly Tubbies
would not work if a RATM tune were used as a theme song. This is an extreme
exaggeration to reinforce the notion that the right music is important for any
show.
The production
phase of the TV program begins on the day of taping. The cast and crew are
assembled to rehearse and tape a show. Anxiety and apprehension will be high,
but that is to be expected. Even the cast and crew of SNL still get the same
jittery feeling every week just prior to the first minute of the show being
broadcast to millions of people. What will greatly diminish one’s anxiety level
is to be as prepared as possible. In most productions of live TV, such as the
Academy Awards show, ample time is allotted for rehearsals.
Typically, the postproduction
phase commences after the taping of the show on location or in the studio. In
COM 3210, postproduction occurs earlier when the producers edit
the video clips to be included during the final production. In the broadcast
television industry, if something went wrong or if the show ran longer than its
intended length, the producers could later edit out any offending
material or shorten the show to the exact desired length.
CAMERA OPERATIONS
We are going to use our
studio camera to model the parts of the camera you should be familiar with. The
central part of the camera is the camera head, which contains a majority of the
electronic circuitry to control the vast number of functions a video camera can
execute.
The lens is
essentially a metal tube comprised of ground glass disks engineered to operate
in tandem to produce photographic type effects like focusing and zooming. The
lenses come in a variety of focal lengths and are interchangeable on most pro
models.
The viewfinder is a
very tiny 5” television monitor sitting on top of the camera head. It allows
the operator to monitor what the lens is capturing now. Viewfinders like
this one are used primarily for studio style production when multiple cameras
are covering a live event and mixing the images in real time. This is the
opposite of single camera film style.
The tripod is the
three-legged base that supports the camera components. Tripods are made of
aluminum tubing and lightweight plastic and are crucial to ensuring a steady
well-composed camera shot.
Dolly wheels can be attached to the feet of a tripod,
permitting the tripod to move about easily on a studio floor.
A CCD is an acronym
that you do not need to know what each letter stands for. You do need to
know that a CCD is an electronic chip that processes image information captured
by the lens. The best cameras have three
chips to record the holy trinity of additive TV color:
RGB: Red Green Blue
Actually,
its magenta (red), cyan (blue) and green, but simply RGB is fine for
now.
Aspect ratio in TV relates to the dimensions of the signal
displayed on TV monitors.
4:3 is a ratio expressed simply as 4 parts to 3 parts.
The TV that you grew up with had a screen that was 4 parts wide and 3 parts in
height.
NTSC has been the broadcast engineering standard for
television since the 1940s. It borrowed the 4:3 or 1.33:1 aspect ratio
from pre-widescreen
Framing
and proper shot composition is crucial to an aesthetically correct television
program. Here are the 4 basic shots you need to know for this class.
The Close Up shot frames the talent from
around the subject’s neck area to around the top of the forehead. This shot is used
in certain interview and dramatic situations. More is revealed about the talent
or the subject in this shot.
The Medium Close Up frames the talent
from around mid chest to the top of the head. This shot is also known as the
talking head, as that is what fills up the frame. This shot is perfect for
inserting character generator information in the lower third of the frame, as
shown here.
The Medium Shot frames the talent from
around the waist to the top of the head. This shot is used in demonstration
shows where equal parts of the talent, props, and the set need to be seen on
screen.
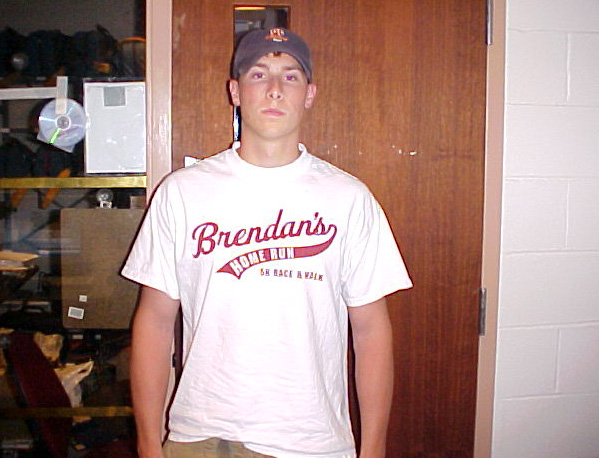
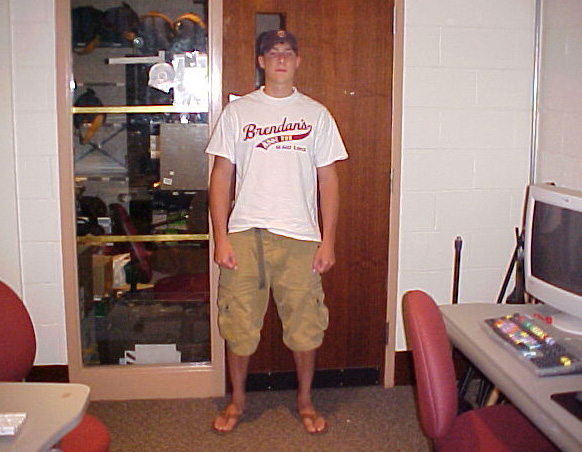
The Long Shot frames the talent from the feet
to the top of the head. There are instances where the framing of a Long Shot
can exceed the top of the talent’s head to include important information behind
them, such as a stationary building or some activity like a sporting event.
Headroom
is the tiny bit of space allowed between the top of the talent’s head to the
upper horizontal edge of the camera frame. Certain shots look awkward of there
is not enough headroom.
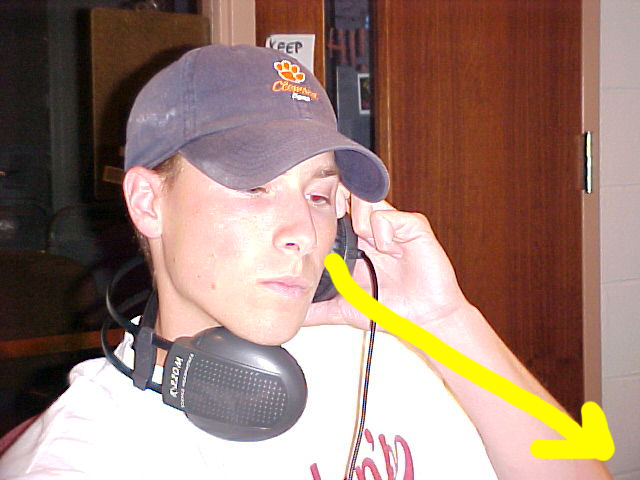
Nose room is allowing enough space in front of the talent’s face in the shot.
The viewer needs a psychological clue as to where the talent is looking.
Generally, if the talent is looking stage right, their head is positioned a bit
more to the right side of the frame. The opposite is also true.
Lead (leed) room follows the same principle and is applied to
physical movement in any direction. If a person or object were moving from left
to right in the camera frame, then they would be positioned closer to the left
side of the frame. As before, the opposite is also true.
The XYZ axis
borrows its name from the advanced algebraic principle of plotting points in
three dimensions. All the camera movements (or transitions) you will learn (pan,
tilt, zoom) fall into the XYZ axis.
The Pan is a
movement along the horizontal or Y-axis. This is performed by gripping the
tripod handles and swiveling the camera left and right.
The Tilt is a
movement along the vertical or X-axis. This is performed by again, gripping the
tripod handles and swiveling them up and down.
Whenever panning
and tilting, make sure that the Pan Lock and the Tilt Locks are open.
The Zoom is a movement
along the Z-axis. The camera does not have to be moved. The lens provides the
movement, or in reality, the illusion of movement. The lens is also controlled
mechanically by the zoom servo mounted on the tripod handle. Tiny gears work
together to move the series of lenses inside the tubular enclosure. This
creates the zoom effect, the illusion of bringing the subject to the
viewer.
Focusing technique for any camera operator is very simple and essential.
The camera operator hears
the Director’s command and frames the shot.
Next, they zoom in on the main subject as far as the zoom lens will permit. The camera
operator can adjust the focus until the subject is sharp. Then, they zoom
out to the shot they want. Now, if they want to zoom in to change their shot,
the subject will stay in an acceptable focus range throughout. Lighting
conditions play a big part in this as well.
White balancing is a video camera’s method of electronically setting
the proper balance of color in the image. To complete this process you will
need a somewhat flat and reflective white surface. The video camera lens
takes a reading of the present lighting conditions reflecting off the white
surface and sends that data to the camera’s “brain” for processing. Why? In the
color spectrum, which we will discuss later, all color wavelength (remember
ROY G. BIV?) blended together creates white light. For a video camera to
decide how it should set its own colors, it needs to examine the entire color
spectrum present. This is discussed further
in the next section.
LIGHTING
All light in the universe
is a series of electronic pulses similar to radio waves or microwaves from your
oven. All light has, among many other things, a color temperature measured on the
Kelvin scale. However, this scale has nothing to do with measuring how
hot or cold something is.
In order to measure any kind of temperature, we need a
scale to measure it. Three temperature scales are used today. The Celsius scale (°C) is used in most of the world to measure air
temperatures. In the
The Kelvin (°K) scale is used by scientists and for astronomical temperatures.
This would also include light from manufactured sources (light bulbs) as well
as from natural ones (stars).
Recalling ROY G. BIV would be helpful in remembering color temperatures of
different light sources. Ranked from “warmer” to “cooler” color temperature are
as follows:
Red
Yellow
Green
Blue
Indigo
Violet
Studio light of the type that is in the VU TV studio
is measured at 3200 degrees K. This color wavelength exists in the red end of
the color spectrum. Incandescent light bulbs used in the home are in this wavelength.
Tungsten is the metal from which light filaments on the red side of the
spectrum are constructed. Tungsten emits a constant color temperature.
Going up the scale, the next light source
to be aware of is fluorescent light. Fluorescent light is odd because
the majority of the bulbs found in public use contained a mixture of different
electrically charged gasses, each with their own color temperature. The
video camera reads this, becomes confused by the conflicting data, and defaults
to a setting that lies closer to the “safe middle” of the spectrum, where the
“ugly” green resides. Ugly only in the sense that certain video footage shot
under standard fluorescent light tends to have an unnatural looking greenish
cast. This is approx. 4500 degrees K. There are more expensive professional
photography grade fluorescent light bulbs with more stable color
temperatures used in the TV and film industry.
Direct sunlight reaches in to the blue end of the color
spectrum at 5600 degrees K. The light waves from the sun have a direct shot
from the upper atmosphere to the surface of the earth. That is, unless there
are cloud layers present.
Cloudy days can increase the color temperature of
sunlight to 10,000 degrees K. Clouds act like mirrors and bounce the light waves
from the sun around like crazy, especially when more cloud-cover is present.
The grid is the network of steel pipe and
braces on which TV studios hang lights, or lamps, as they are commonly called
in the industry.
A lamp is very simple in design. A metal
housing contains a bulb rated anywhere from 100 to 1000 watts. The bulb can be
exposed or housed behind a glass lens.
The most versatile light on a studio grid
is the fresnel, (frah-NELL) named after the 19th
century French physicist Augustin Fresnel,
who researched how light waves can refracted by ground glass disks. Fresnel’s work led to the development of a lens with
concentric grooves cut into each glass lens. This specially engineered lens
allows the light to either be tightly focused on an area or widely
diffused by adjusting a control.
A broad is a lamp that diffuses
light into wide areas. It is especially useful as a fill light, which we
will discuss later. A broad is a lamp that typically has no lens
or covering, unless someone in the studio crew affixes a gel or a scrim
in front of the bulb for a special effect.
A scoop is like a broad,
except instead of being rectangular shaped, it is round. Other than that, its
functionality is similar.
A spotlight is like a fresnel, but it uses a series of lenses to create
the tight focus/diffusion effect with the light. In many studios, spots
are used for special lighting effects.
Gels are heat resistant plastic sheets. They come in all colors
and are usually mounted in frames and affixed to studio lamps with the proper
mounting hardware.
A studio dimmer board, a.k.a. the light board, controls all the studio
lamps. The dimmers raise or lower the intensities of the lights on the studio
grid.
The “point” of 3 Point or Triangular Lighting is to
create the illusion of three dimensions on a flat two dimensional screen. Light
and shadow work in tandem to create this illusion.
Key light is the main component. It hits the talent
at an approx. 45-degree angle from their downstage side, preferably. Fresnels are best used for key lighting, as
they are able to provide a near pinpoint beam of light anywhere on the stage.
To balance the sharpness of the key
light, a fill light from the upstage direction hits the talent at the same
45-degree angle, but at about half the intensity. The fill light’s
function is to soften the shadows created by the key light. It also adds
to the enhancement of the 3D effect. A fresnel
or a broad can be used as a fill light.
Directly behind the talent is the back
light. It hits the back of the head at approx. 45-degree angle and spills
off onto the shoulders. Back light separates the talent from the
background, enhancing the 3D effect. Fresnels
work best as back lights.
Those are the basic three. You need to be familiar with one more.
A background
light illuminates the set area and/or a cyclorama. Any type of lamp will do. Broads work the best.
Gels and patterned metal disks called cookies can be
used with lights to create shapes and color schemes. Thousands of dollars could
easily be spent building sets, so careful considerations are made when lighting
them properly.
MICROPHONES AND SOUND
You should be familiar with the two main
types of microphones used in TV production.
Dynamic
Condenser
These two groups encompass a wide variety of
similar and divergent characteristics, but for your purposes, you only need to
know these basics ¼.
Dynamic microphones are sturdy and very shock resistant. They are
best utilized for remote productions. You can drop them on the floor and most
cases; they will not be damaged to the extent that they will not work at all.
Because of this rugged design, they are not as sensitive to the subtleties of
sound waves like condenser microphones. The handheld microphones that
are included with our camcorder kits are dynamic microphones.
Condenser microphones are fragile and very
sensitive, so they are best utilized in the studio environment. They are
engineered more elaborately than dynamic microphones. If dropped on the floor,
the mics would likely be damaged. Our lavaliere
lapel and boom microphones are condensers.
Microphones can be further broken down
into smaller classifications. Pick up pattern is feature of all
microphones that are used in TV production.
cardioid
omnidirectional
A cardiod
(a.k.a. directional, or unidirectional) microphone is one that
picks up audio waves from one direction
only. The word cardioid is derived from the
Greek work cardiac, or heart shaped.
An omni-directional microphone is
just what it says. The pick up pattern includes all directions away from the microphone. This microphone is useful
for recording in areas where there is a lot to cover.
Lavaliere microphones take their name from a French
word for a type of pendant that hangs around the neck, as that is what they
best resembled when they were introduced in the 1950s. In later decades, clips
and tie pins replaced the obtrusive cord around the neck. Lavalieres, like
any microphone, must be correctly placed or clipped to the talent to
ensure a clear sound signal.
Handheld microphones are used for musical performers and programs
being produced on a very large theatrical type stage. In recent years, headsets
have replaced handheld microphones. Handheld microphones are also
used extensively in news production.
Boom microphones are used in certain applications where complex
audio requirements have been planned for a production. This type of microphone
is perfect for production where the talent cannot hold or wear a microphone, or
where it is very noisy. This type of microphone is used primarily in the film,
documentary, and news industries.
Microphones can be hard wired or connected
with XLR cables or use wireless technology. The lavaliere
lapel microphones we use in the TV studio are wireless only. The part
you clip to your belts are little radio transmitters that send the audio signal
to little receivers under the console in the control room.
We have wireless handheld microphones for the studio for extra large
productions. Handheld microphones can be wired or wireless
in our studio.
Choosing wired vs. wireless must be suited to the needs of the production. If
taping in areas subject to lots of radio frequency (RF) interference, then
wireless microphones will be problematic.
There are microphones to record every type
of sound under any condition, extreme or otherwise, known to humankind.
However, in order to be heard, they must be plugged into an audio mixer.
The audio mixer routes any sound
source, whether it be a microphone, CD player, or a videotape deck. The signal
from the mixer can be sent to different destinations, such as the studio
monitor or the program VTR.
See the schematic diagram of the Mackie 1604 on my homepage. The faders control the volume
of the sound coming and going out of the mixer. They must all be in proper
balance to avoid problem like feedback and over modulation.
Feedback occurs when open microphones are too close to audio
monitors, and the open microphones pick up and repeat the sound coming out of
the audio monitor. An unwanted loop of sound is created inadvertently. A loud ear-piercing squeal is a sure
indicator that feedback is present.
Over modulation occurs when a few things possibly are
happening. A microphone is too close to the sound source. A fader on the audio
mixer is not adjusted properly and it is permitting the signal to break up.
The TV studio’s Character Generator
(CG) is a video typewriter that allows us to create and insert graphics
into the program feed. We have a choice of fonts, colors, backgrounds, and other
effects. It is set up with a standard QWERTY keyboard and a vast array of edit
menus for all the different features.
The video
switcher routes all the video signals on the same principle the audio mixer employs. There are two
buses or rows of buttons on the video
switcher…
preview bus
program bus
Every video source is on the preview
bus and the program bus. Think of the video signals going through
the program bus (hence the term program feed) as what is going
out on the
air or what is being recorded on a VTR.
Think of the preview bus as the
next video source to which you can transition. If you are going to transition
using a dissolve or a wipe, you need to use both busses. To transition using
cuts only, the preview bus is not required. Each bus has its own video
monitor on the control room console.
You can transition between busses with the
fader bar or the PLAY button, which, when pressed, serves as an auto run
feature.
The transition menu contains literally
hundreds of video transitions that can be selected.
The “basic three” are
cut
dissolve
wipe
All 500 transitions on our video
switcher are basic derivations of the above.
All shows begin and end in a Federal
engineering signal standard called 7.5 IRE black. For our purposes, we
will just call it black. A Director would call for a fade from black
at the beginning of a show and a fade to black at the end, or anytime
commercial breaks are to be inserted later.
The video
switcher keys or mattes one
image over another image. Our character
generator has a built in chroma key feature that processes the program feed
downstream from the video switcher.
A cut is an instantaneous transition
similar to the blinking of an eye. Perspective and tempo can shifted with the
use of a cut transition. It is the most basic transition in all
the visual media. It traces a direct line to the primitive film editors from 90
years ago who glued together pieces of nitrate film stock. Since the advent of
MTV, cutting from shot to shot has
become far more rapid in TV and films. You have mostly likely absorbed billions
of cut transitions in the time you have been watching TV or films. A
3-minute music video can easily have hundreds of cuts or other transitions.
The dissolve is an overlapping of
one shot over another. In TV and film, it is used to indicate psychologically a
passage of time, especially in fictional narratives. The staging of musical
pieces can be enhanced by using the dissolve as the primary transition.
Wipes are used to show simultaneous action taking place
elsewhere and make useful scene transitions in comedies and dramas. Picture in Picture (PIP) is an often
used form of wipe that mixes two windows of real time video.
VTR stands for video tape recorder. It is named to differentiate from the consumer
level videocassette recorder. Use of the acronym VTR indicates a more professional level tape deck. While better
consumer grade VCRs range from $100-300, our studio grade VTRs range from $4000-5000.
The record and playback the program feed
from the video switcher and the character generator.
The TV studio can import/export video to
digital or analog format. What are they?
Digital formats the TV studio supports:
DV
miniDV
DVCAM (Sony)
DVCPro (Panasonic)
Analog formats the TV studio supports:
Beta SP
SVHS
VHS
Props (or properties) are physical objects used in the program,
such as the pots and pans used on Food Network shows.
The Cyclorama or Cyc (sike) is the flame
retardant curtain that adorns the walls of our studio. It is mounted to drape
runner styled tracks and moved around easily. Cycs come in many colors and can
be used as backgrounds for chroma or luminance
keying.